Fashion Design Apps for Beginners 1: Adobe Fresco

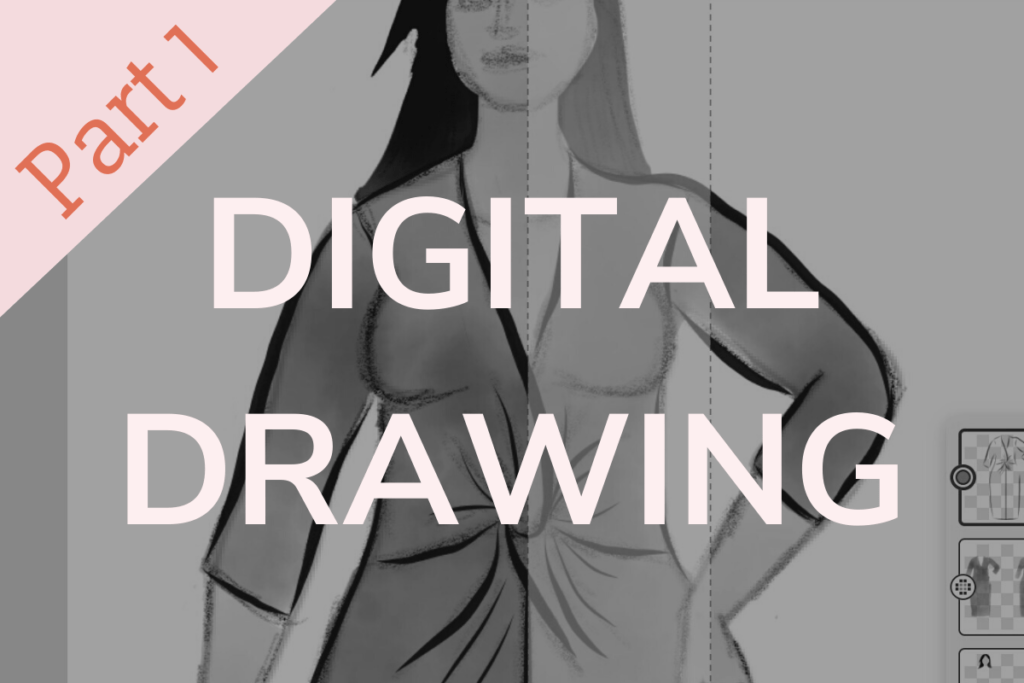
In her last post, Doctor T reviewed her favorite free and paid drawing apps to sketch digital wardrobe plans with MyBodyModel. Now she shares a step-by-step digital fashion illustration series, Fashion Design Apps for Beginners! In Part 1 of this series, Doctor T shares the basics of sketching clothing designs on her custom fashion croquis with the free drawing app, Adobe Fresco.


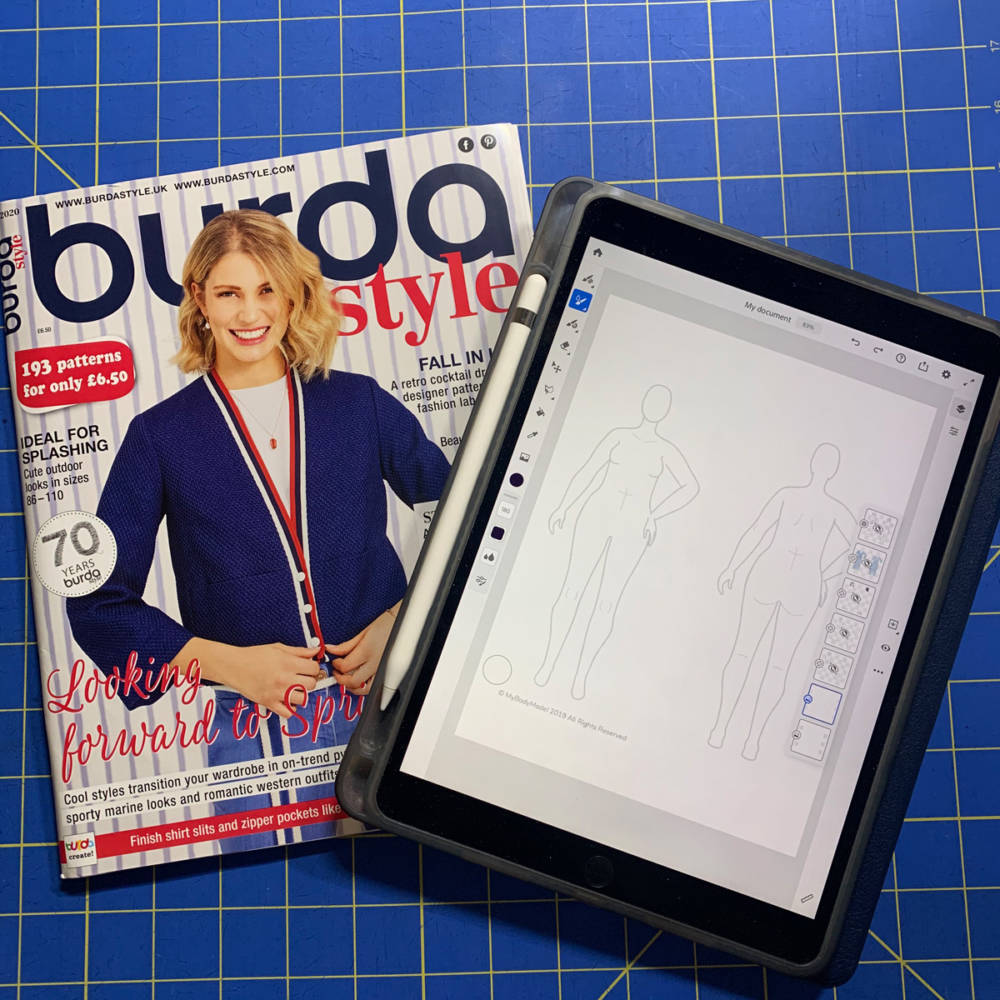
Since I’ve started using My Body Model, “trying out” new sewing patterns has become so easy and fun! In the past, I’d always done a lot of random sketching on odd scraps of paper that would get scattered about and lost.  I think this is probably why I enjoy the idea of a digital sketchbook so much – I get all the fun of having a full artist studio, without having to worry about storing everything or keeping track of my supplies and drawings.  It’s all contained in one handy app, which also means there is zero waste and zero cleanup time!  Plus, I can use all of that real life space for storing patterns, fabric, and notions, which is a bonus when space is at a premium.

For this post, I will do a quick tutorial to introduce the basics of digital sketching. 

Although I don’t consider myself an expert (today’s art apps can do things far beyond my skills or understanding), I think that everyone has the ability to learn the basics that I will go over in this post.  For this tutorial, I will be using my iPad Pro and Apple Pencil, though you can use any tablet and stylus combo that you have access to.  While I have definitely noticed a difference with the pressure sensitivity of the Apple Pencil, I used to use a regular stylus, which always worked fine for basic sketching purposes.

Flatlay of a Burda Style magazine, Apple Pencil and iPad Pro with MyBodyModel croquis file opened in the fashion design apps interface
Here are my tools of choice: iPad Pro, Apple Pencil, and some inspiration.

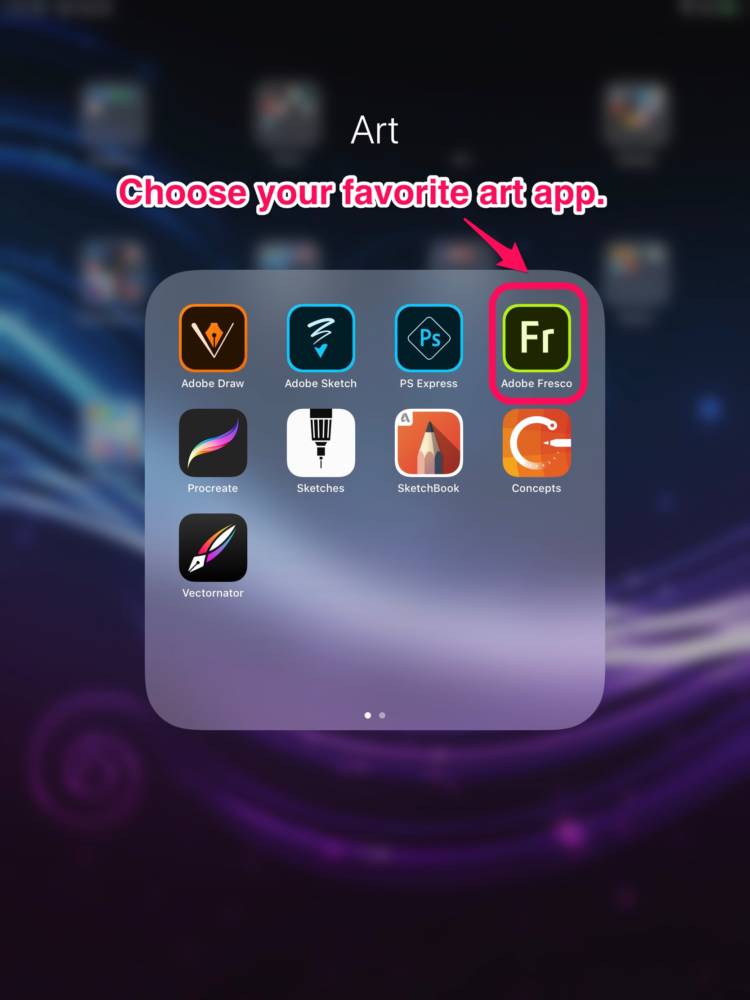
Step 1: Choose your favorite drawing app

There are so many great drawing apps on the market, and you can check out my previous post for the My Body Model blog to read more about them.  They range from being free to being a bit pricey, but since this is a beginner’s tutorial I want to use a free app for this post.  For today’s tutorial, I will be testing out Adobe Fresco – a new app that Adobe will be using to replace and combine Adobe Draw and Adobe Sketch.  Adobe Fresco is a free app, but if you already pay for the more advanced Adobe ecosystem, it will sync with your paid account.

iPad display of the icons of various fashion design apps available
Choose your favorite drawing app. Today I’m going to test out the new app Adobe Fresco.

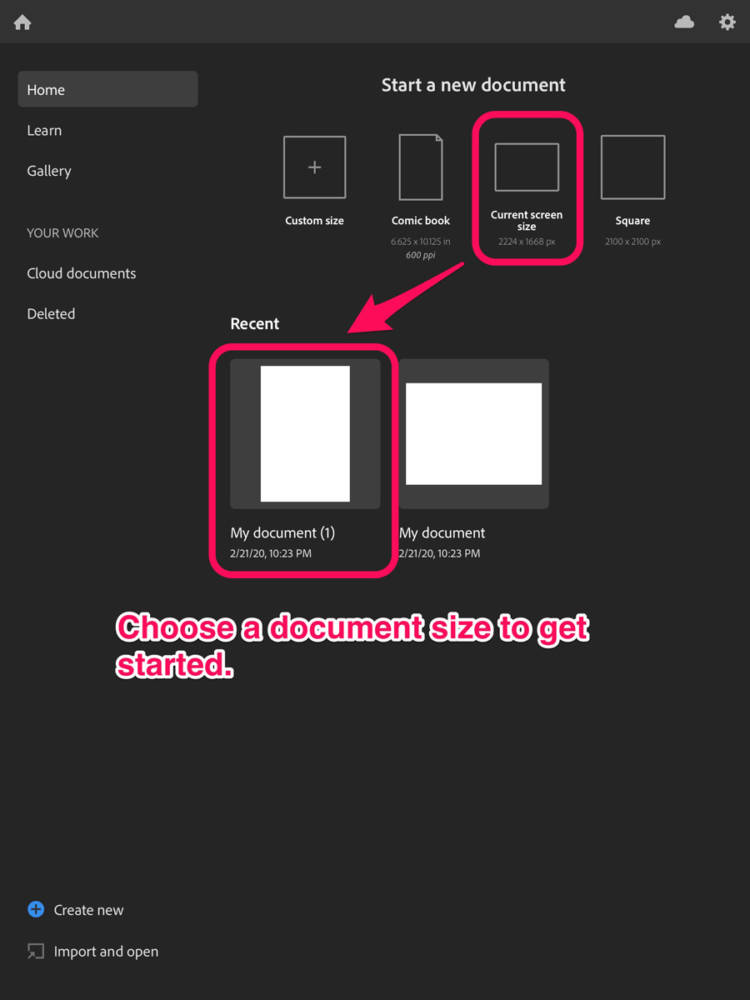
Step 2: Choose a document size

For this project I chose “current screen size” because I only plan to use this image for social media or digital reproduction, but if you want to make something that you can print in a large format you can always choose a “custom size” and make it as large as you need.  Once you create a canvas, click on it to open the project.

Display of the document selection page on Adobe Fresco, the selected app from the fashion design apps choices.
Choose a document size.  I went with “current screen size” because it was fast and large enough for my purposes.

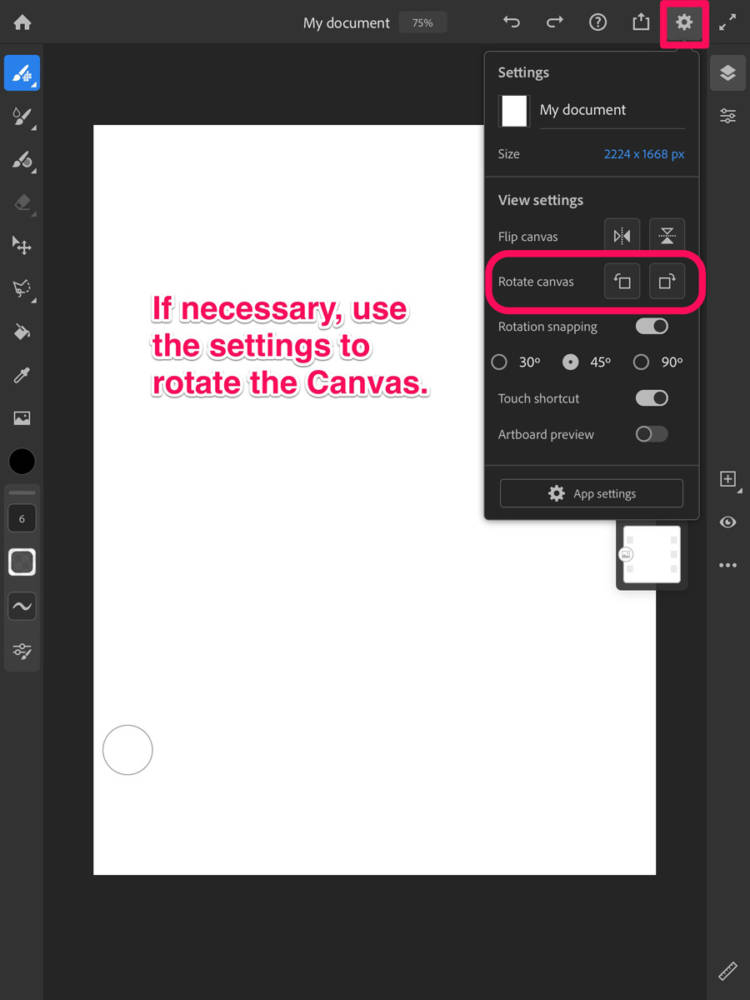
If necessary, use the app settings (cog wheel in the upper right corner) to rotate the canvas.  Since I will only be drawing a single front/back model view, I rotated my canvas to be in the vertical position.

How to rotate the canvas: Adobe Fresco interface displaying settings for canvas rotation.
Rotate the canvas using the document settings once the project is open.

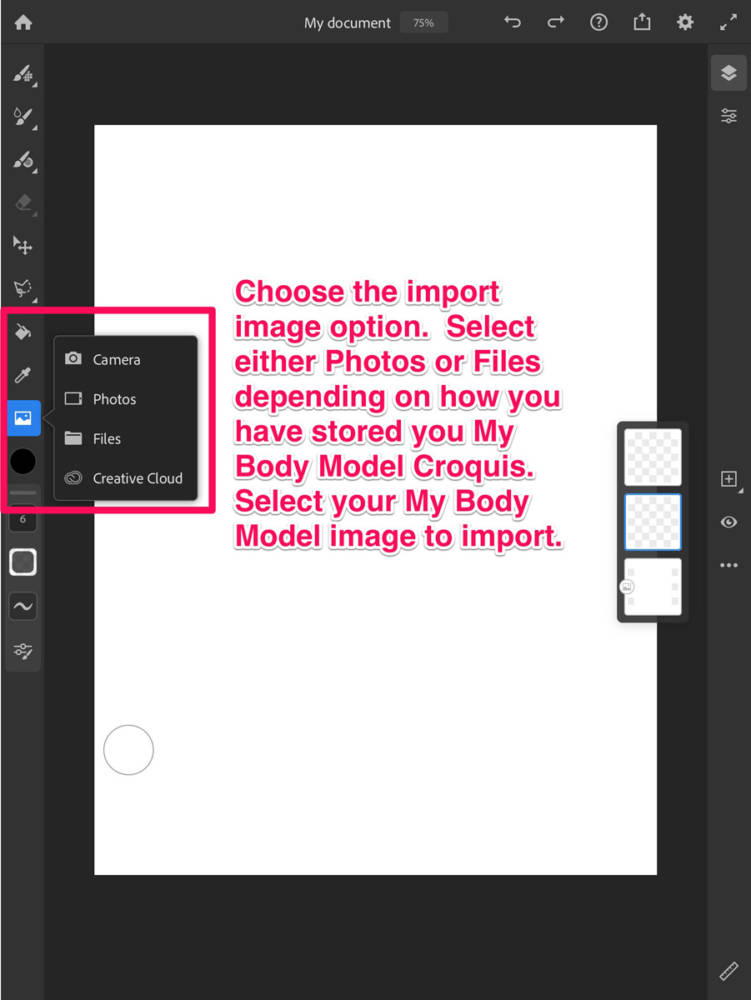
Step 3: Import My Body Model Croquis

To import your MyBodyModel croquis, you will need to have it saved somewhere that the app can access it.  Personally, I have saved screenshots of all of the MyBodyModel printable PDFs to a folder called “Croquis” in the Files section of my iCloud storage.  I find it easier to have everything saved in PNG format so that it is readable by the majority of art apps (not all of them like to read in multi-page PDF files), but your file storage method is up to you.  You could also save your body model croquis to your Google Drive, your photo stream, or your device’s local storage.  Just save them somewhere that is easy for you to remember and access!

How to import your image: Inferface displaying the import image feature in Adobe Sketch
Use the Import feature to import an image or document of your My Body Model Croquis.

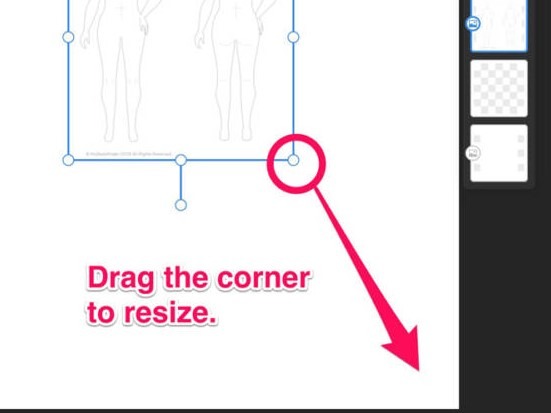
Once you have imported your croquis, drag one of the corner dots to resize the image.

How to resize your croquis: Inferface displaying how to drag the corner of an image to resize, using MyBodyModel croquis in Adobe Fresco.
Drag the image corner to resize the My Body Model image.

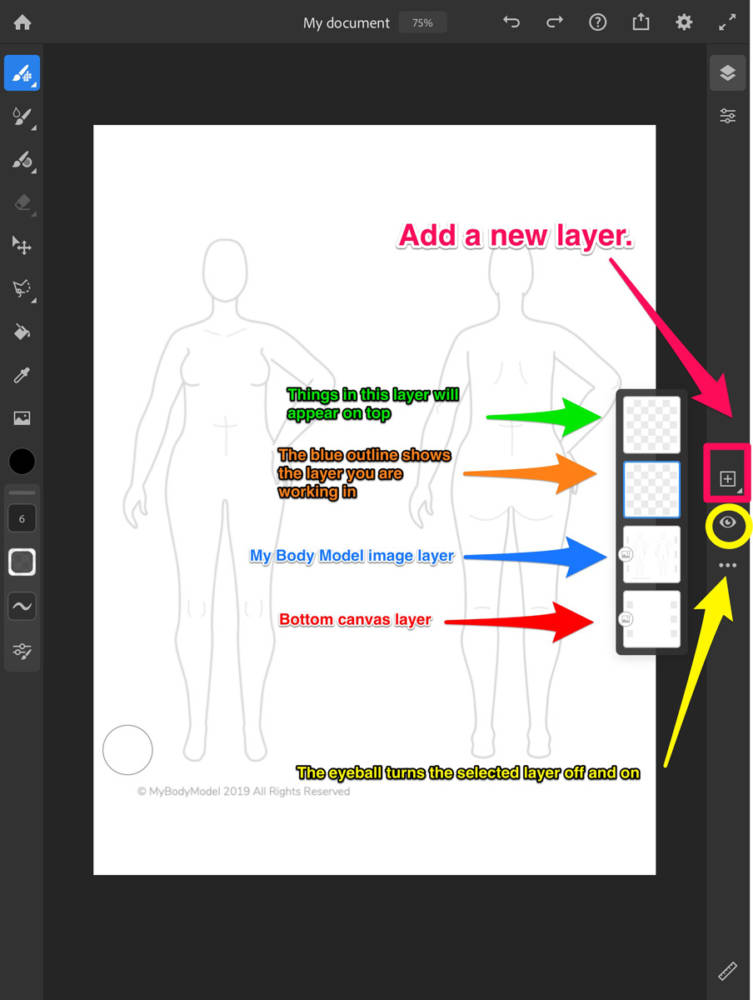
Step 4: Create a New Layer

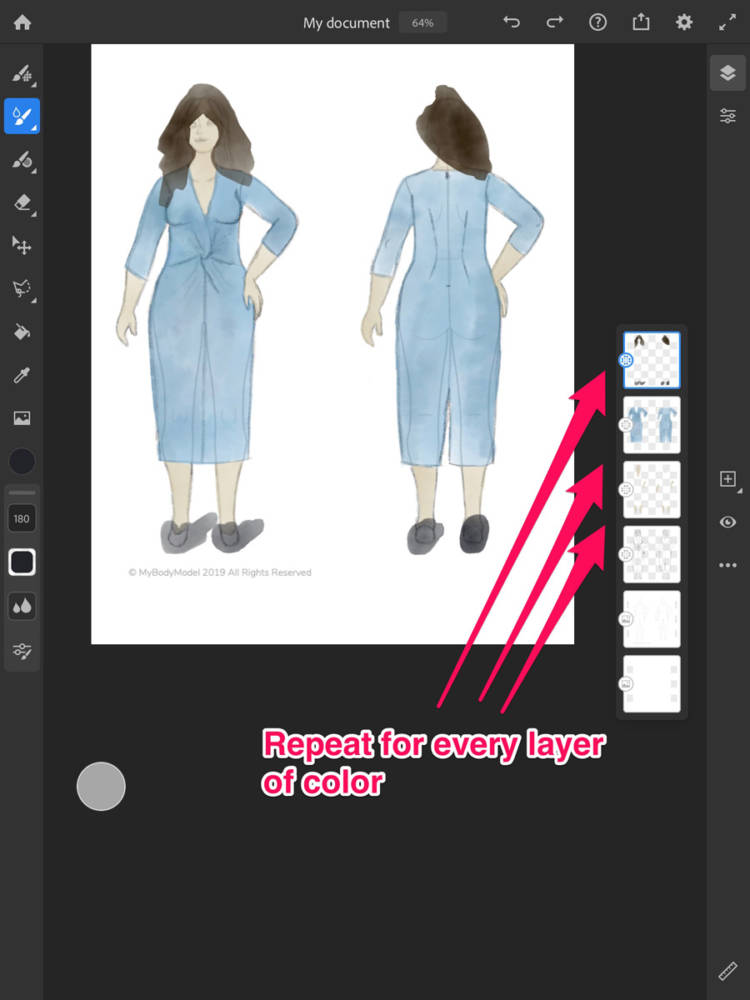
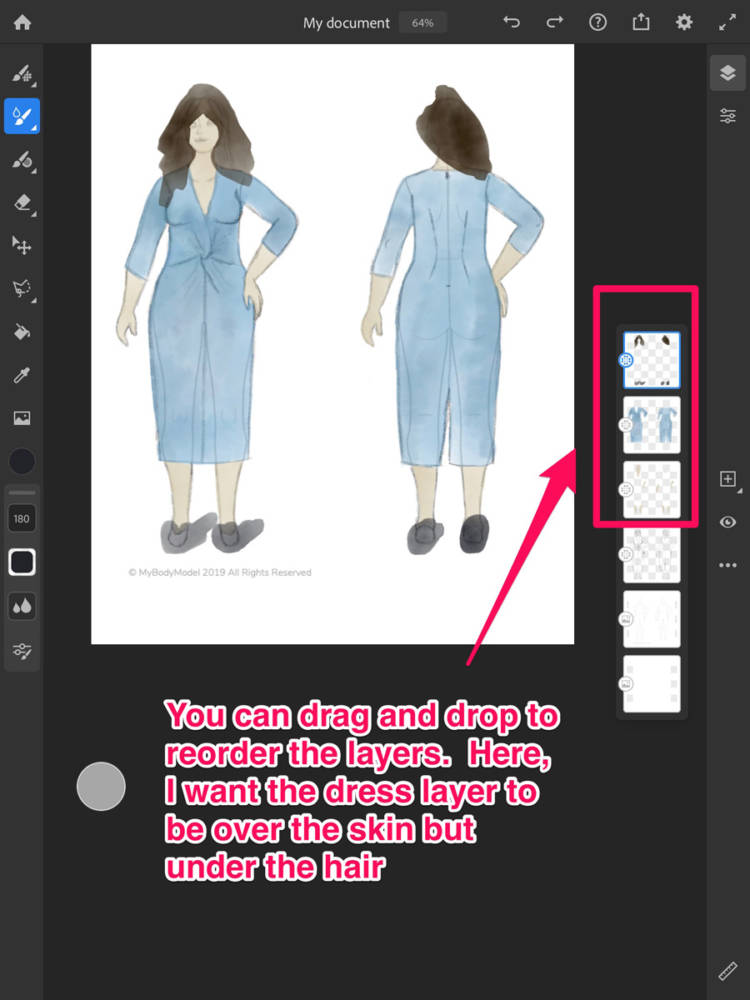
One of the most important concepts about digital art is the idea of layers.  Layers are important because they can let you do preliminary work that doesn’t have to show up in the final art piece, which is especially great for sketching clothing designs on a digital croquis.  Not only can you try things out by turning on and off layers, but you can also rearrange layers to create different effects, or to easily “erase” anything you don’t want in your final image.  You will notice that when we imported the MyBodyModel croquis, Adobe Fresco automatically gave it a new layer.

How to use layers: This is the interface displaying the Layer Taskbar and existing layers, preparing to sketch on MyBodyModel croquis using Adobe Fresco.
Working in layers allows one to isolate different fashion design ideas and make changes to one section of work without affecting the others when drawing with digital apps. Use the + icon to add new layers and the eye icon to make a layer visible or invisible.

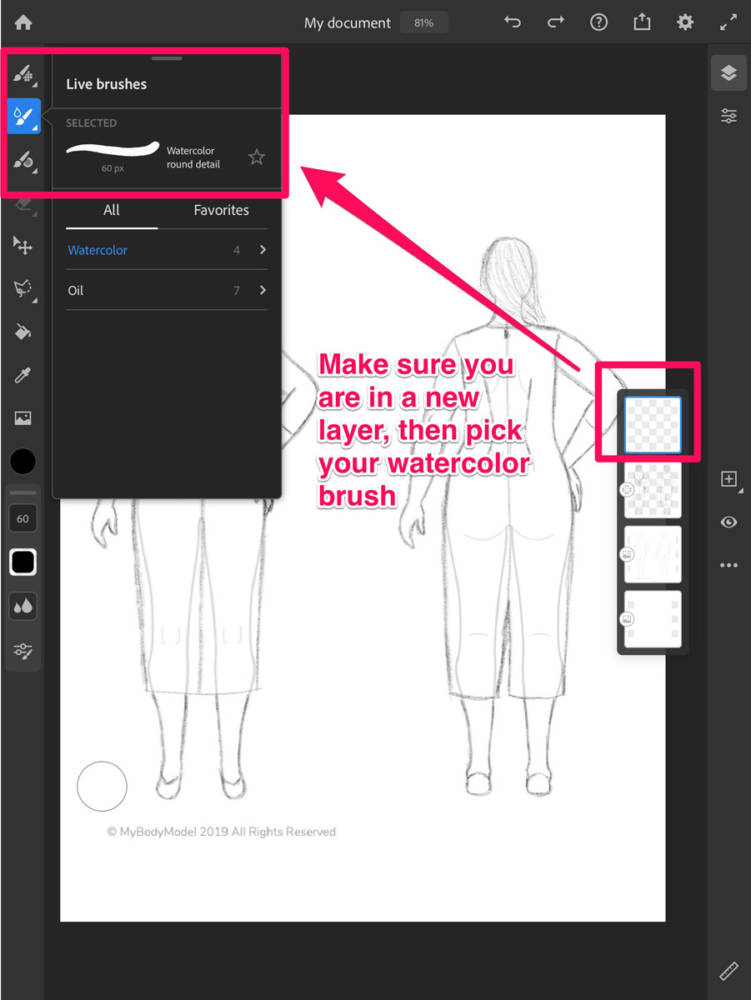
Step 5: Select your sketching tool

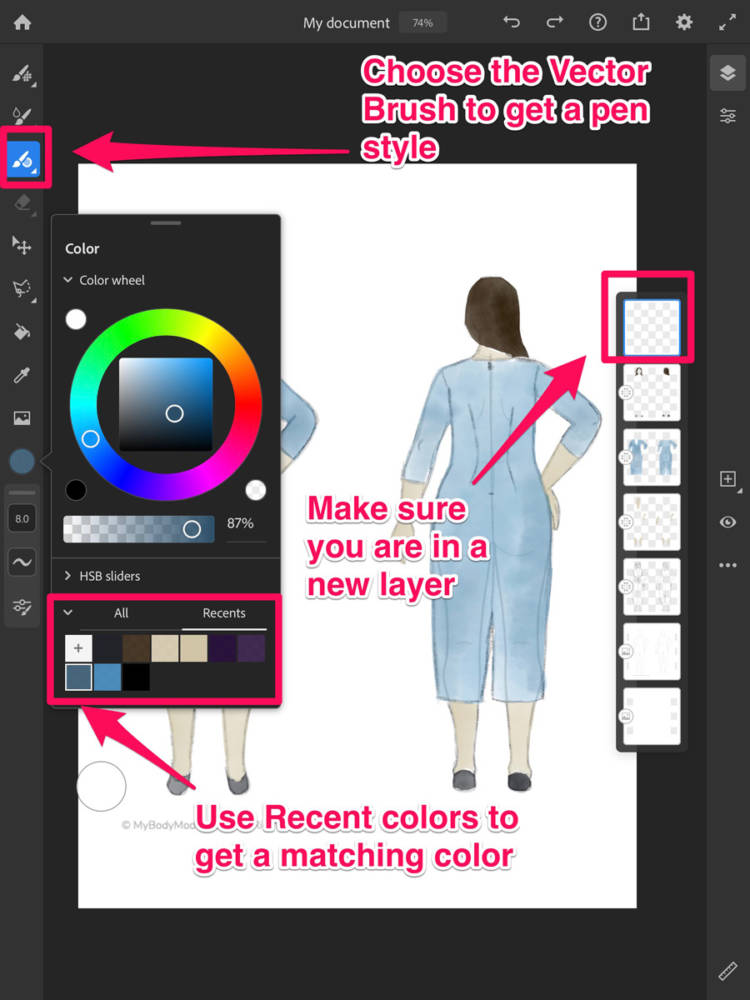
One of the great things about these sorts of drawing apps is the number of tools you have at your disposal.  In Adobe Fresco, they have what they call “Pixel Brushes,” “Live Brushes,” and “Vector Brushes.”  Pixel Brushes will give you texture to your lines (like pencils), Live Brushes act like wet paints and will “move” as you work with them, and Vector Brushes will give you very clean sharp lines (like pens).  Because I like to sketch in pencil, for my first layer I’m using the Pencil option from the Pixel Brush set.

How to choose brushes: This is the interface displaying the various pixel brushes, with a sample sketch of my MyBodyModel fashion croquis using Adobe Fresco.
After creating a new layer, choose from a brush option from one of the three categories of brushes offered in Adobe Fresco.

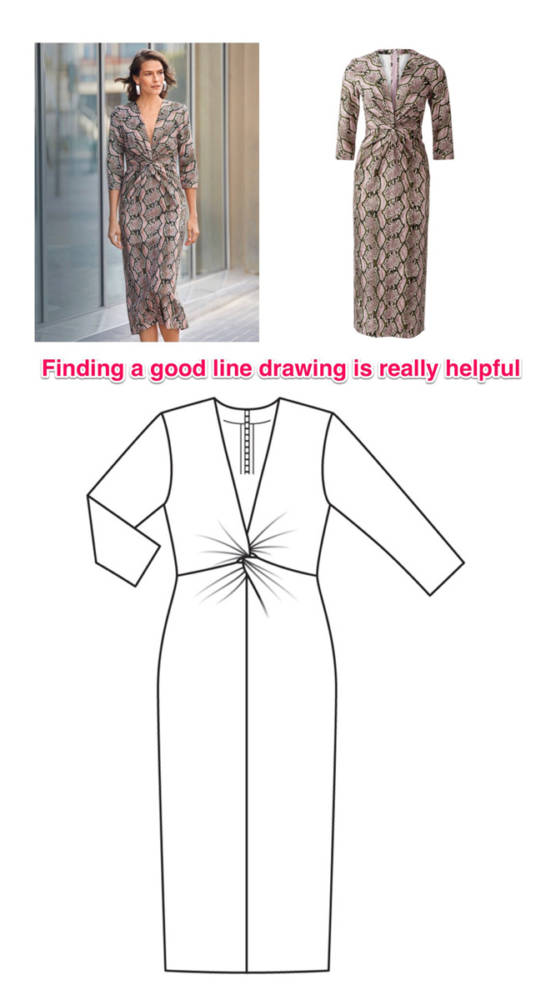
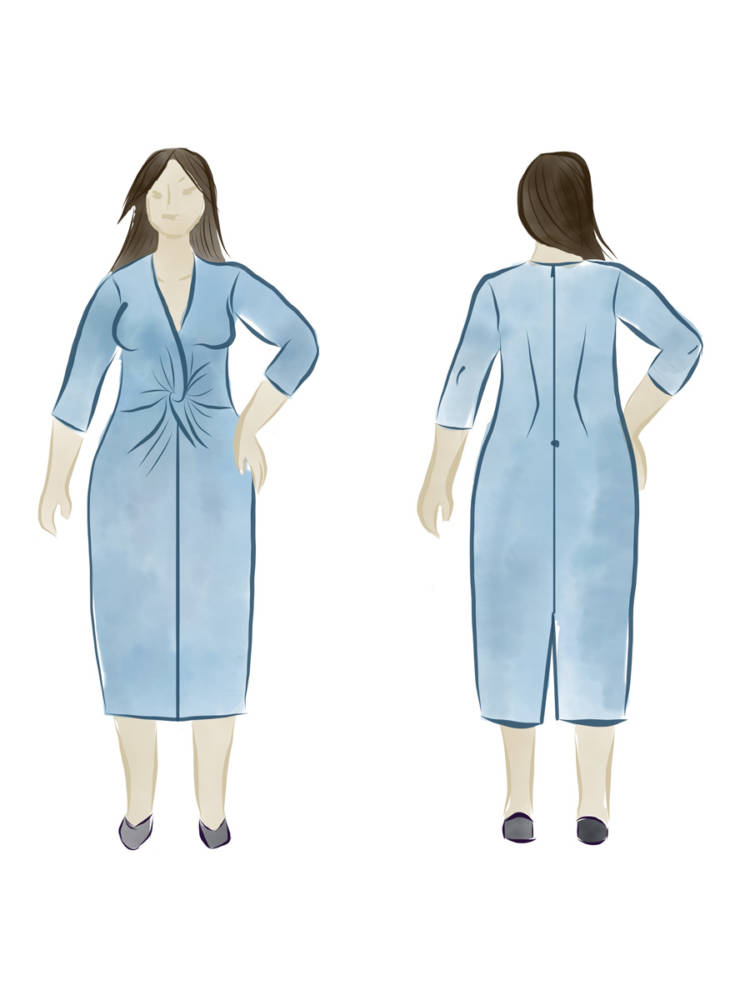
At this point it’s time to have some idea of what you will be sketching.  Although it can be fun to design something totally unique, today I’m going to see if a new Burda pattern is something I’d like to add to my sewing list.

Comparison of the Burda dress on a model, the dress alone, and the pattern line drawing one can refer to when using fashion design apps
Finding a good image of the line drawing for your pattern is really helpful – you can basically copy the lines you see onto your croquis to see how the style will look on you.  For this project I will be using BurdaStyle Magazine 03/2020 #118 as my pattern that I want to test out.

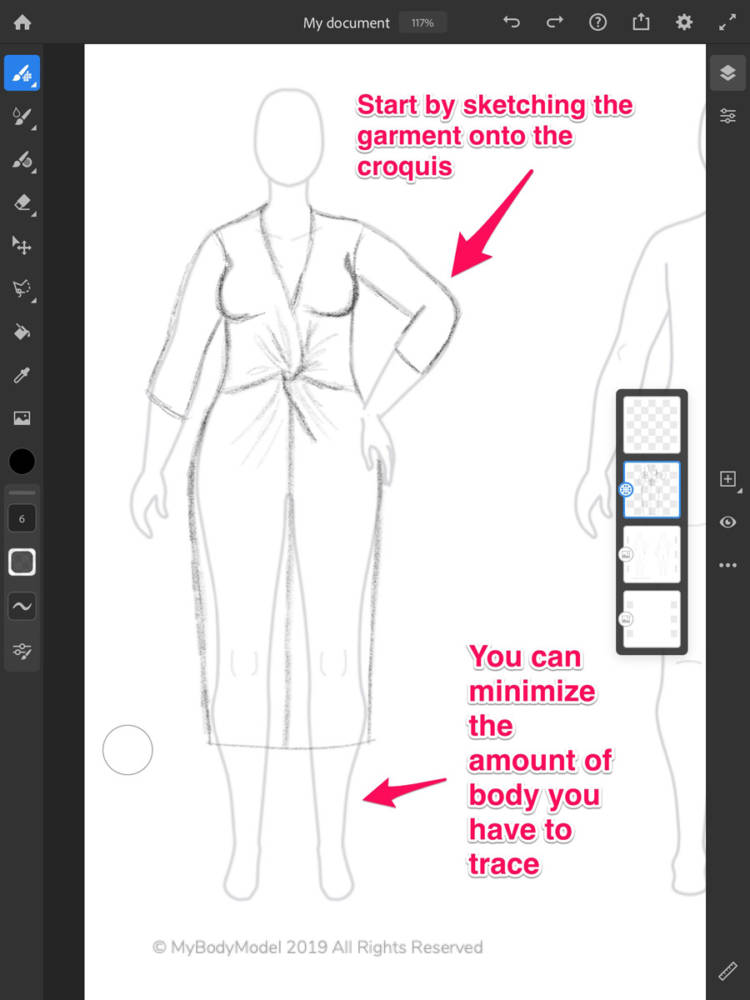
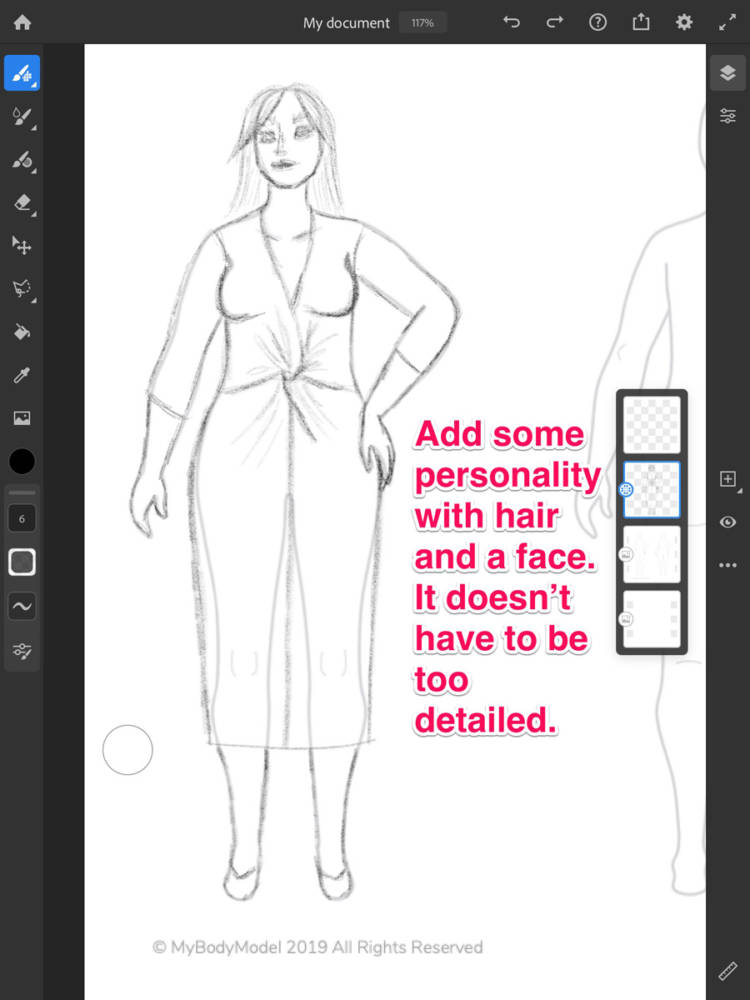
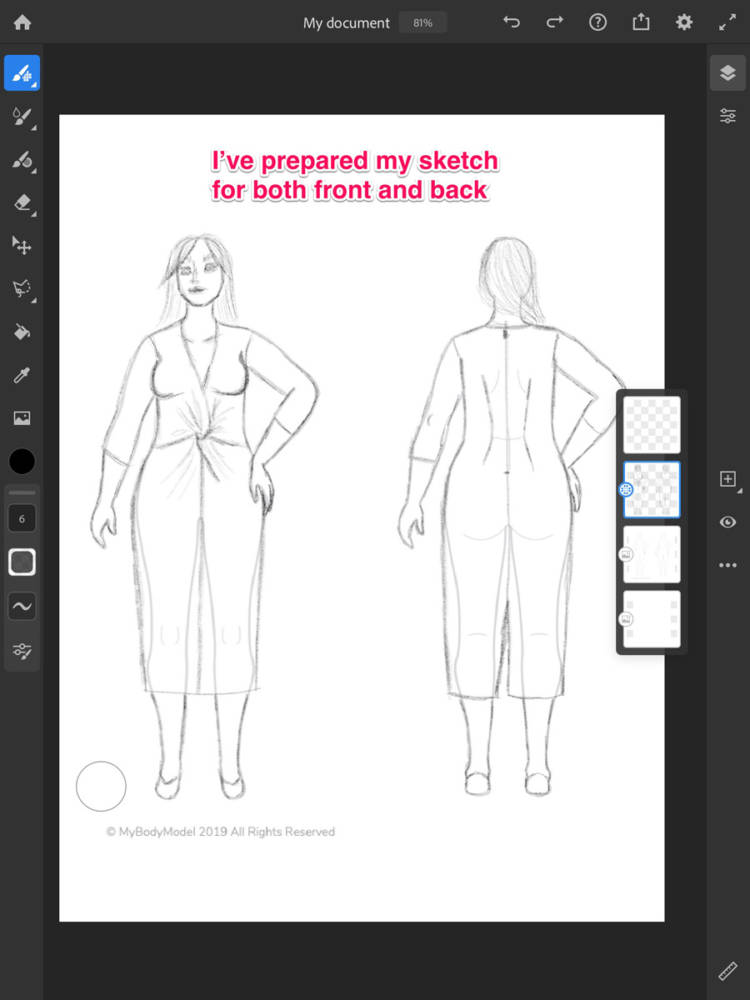
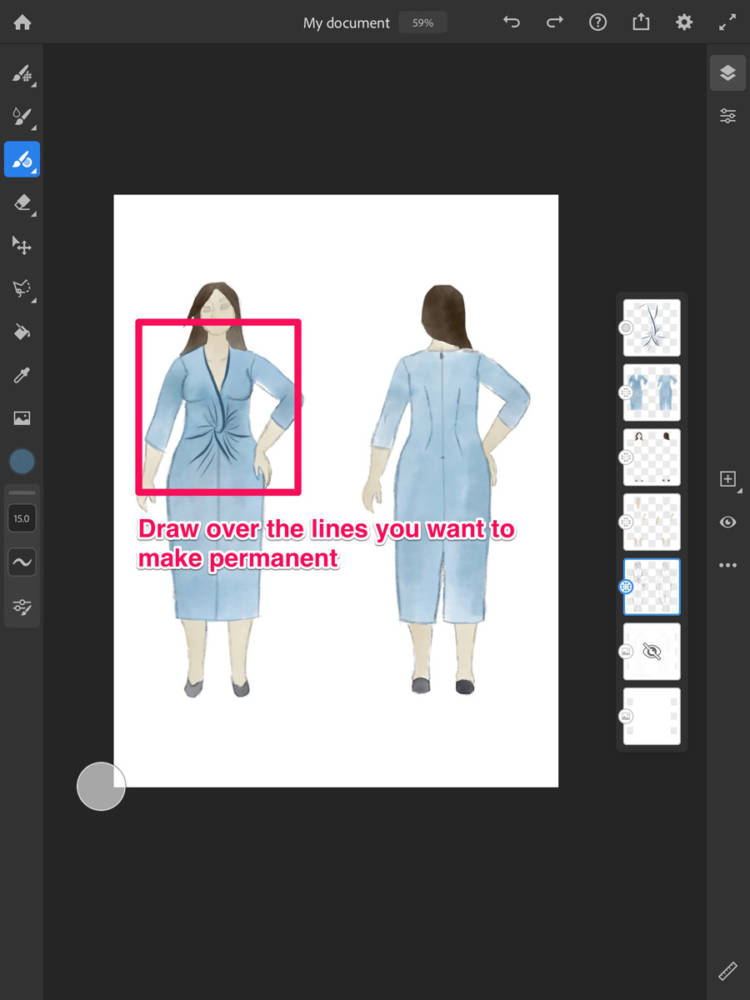
Step 6: Start sketching

This is the fun part – time to start sketching!  I always try to copy the line drawing onto the croquis first, then I go back and add some personality to my girl.
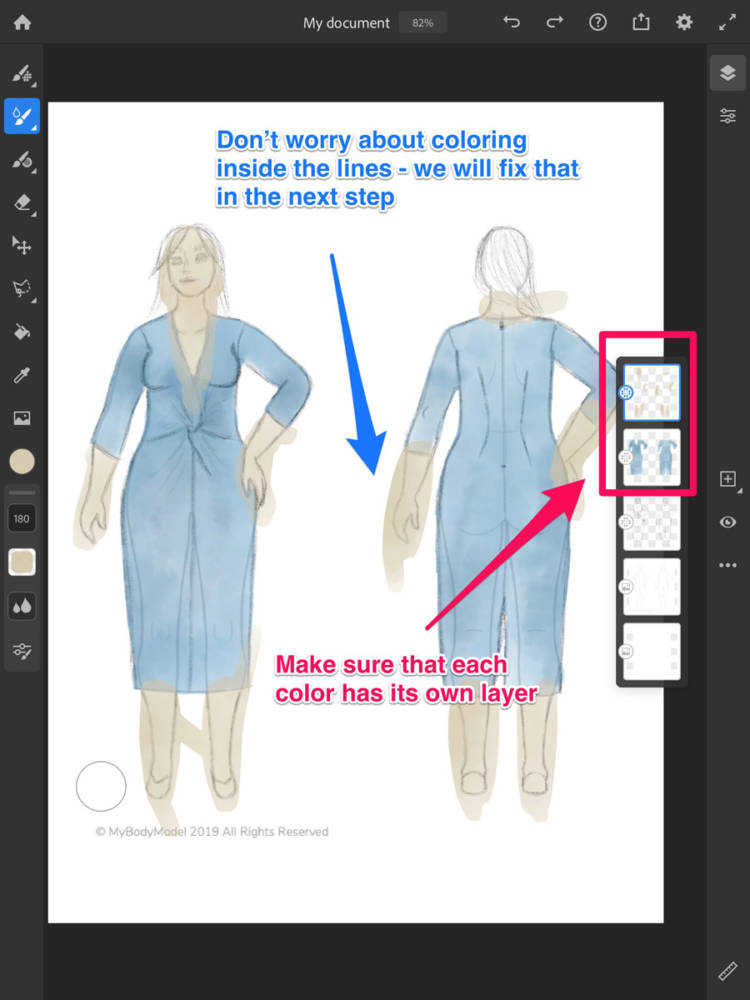
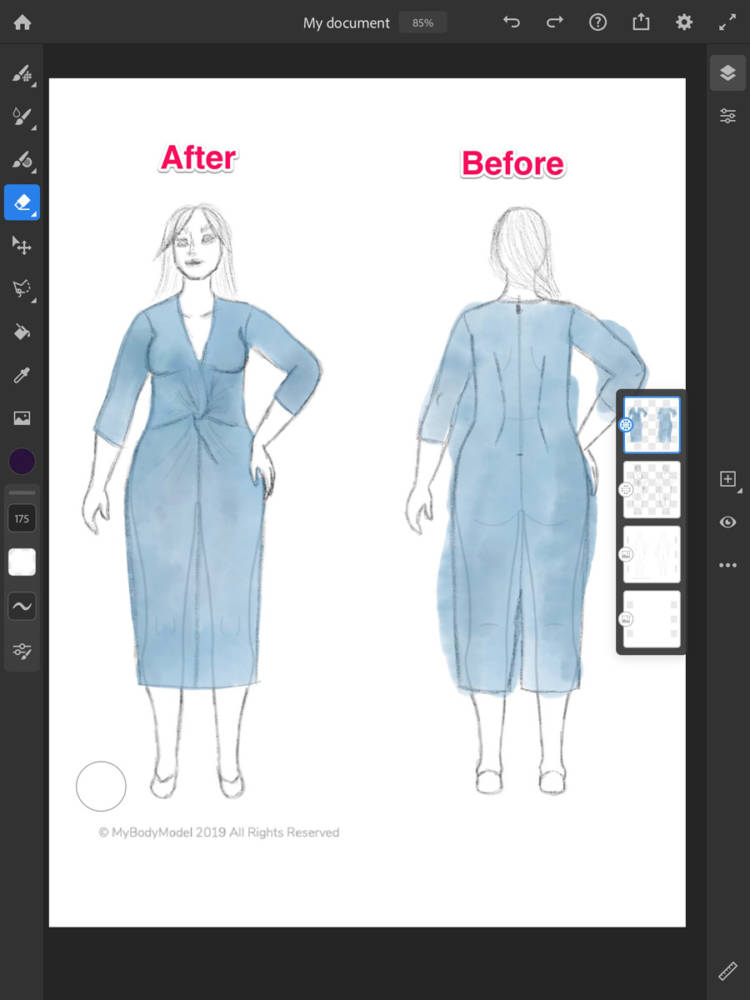
Here is my preliminary "pencil sketch" fashion drawing of the Burda dress pattern onto my personal MyBodyModel fashion croquis, using Adobe Fresco.
This is where you will sketch your chosen line drawing onto the figure.  Because I’ve chosen a close-fitting garment, I can easily follow the lines of the body.
Here is my body model sketch after drawing a simple hairstyle and a face, using Adobe Fresco.
I like to sketch the rest of the body after I’ve finished the garment, because then I can focus only on the parts that will show outside of the garment.  This is the easy part because you just trace over your croquis directly.  I also add hair and very minimal hints at facial features.
Here are my initial "pencil" digital sketches for both the front and back views of the Burda dress on my body model croquis using Adobe Fresco.
I work on this until I have finished sketching everything I want to use as I move forward with my design.

Step 7: Color it in

Although I love the look of a rough pencil sketch, for this design I want to color it in and produce a more finished looking sketch.  I’m thinking of making this design in a solid, but since the garment modeled photo is in a print, I think this could be a great way for me to test out this idea.  For coloring, I’m going to switch to the Live Brushes and use the watercolor option.
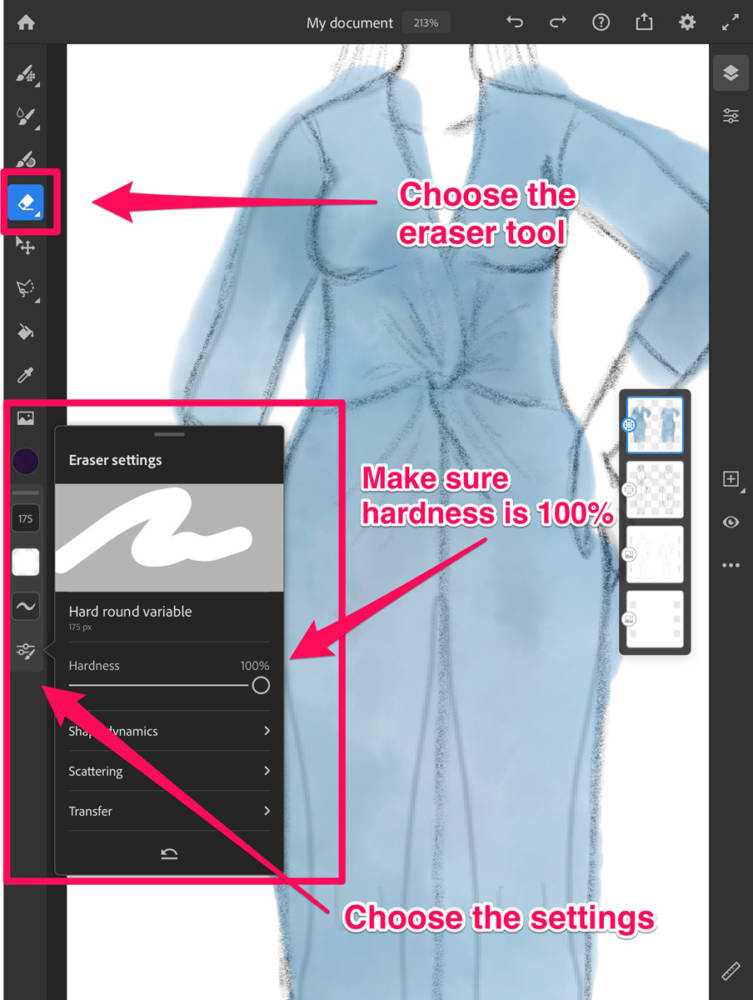
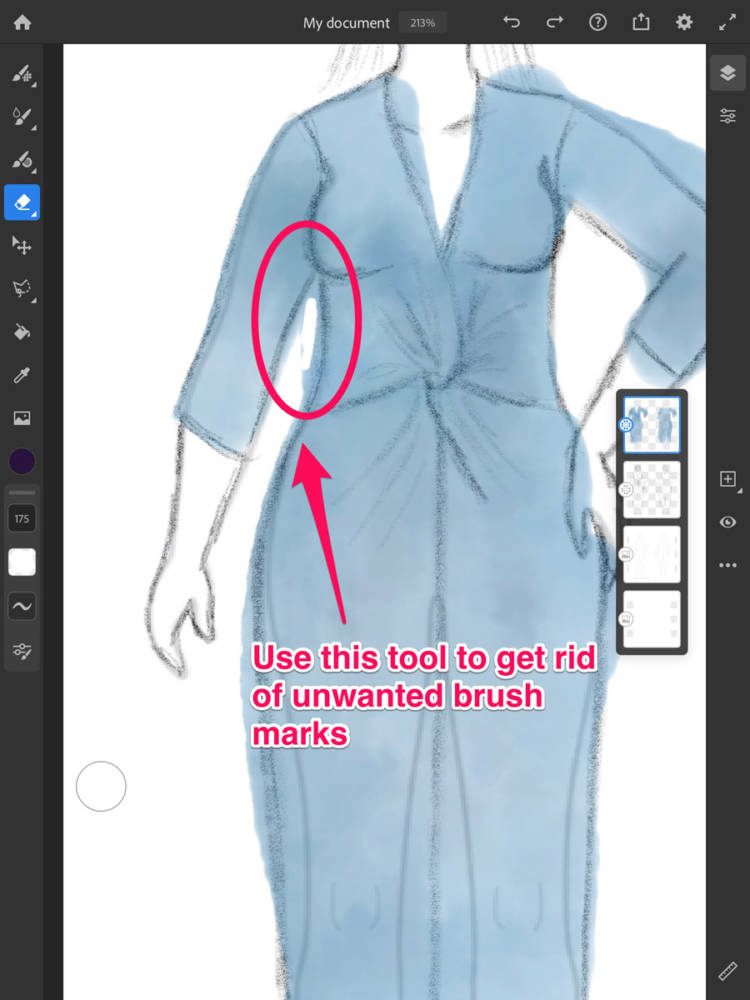
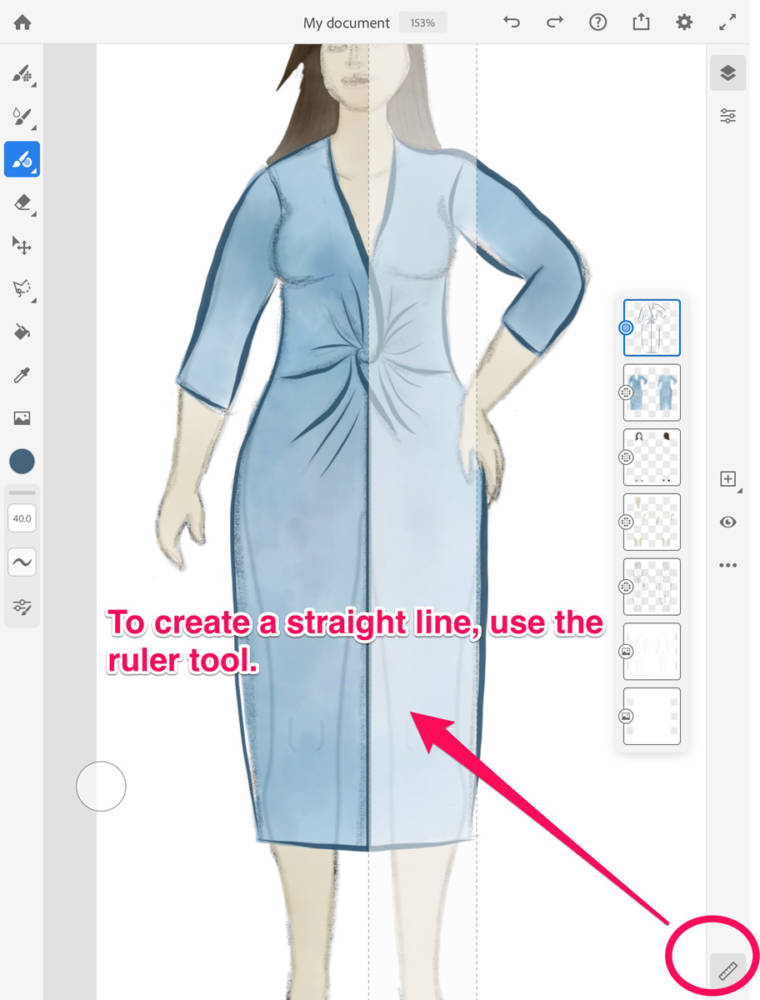
How to color digitally with a watercolor effect: Interface displaying the selection of the Watercolor round detail brush in the Live brushes tab, with a sample sketch on my body model croquis using Adobe Fresco.
Make sure you start your watercolor in a new layer!  This will allow us to have a lot of control over this feature without disrupting the sketch we’ve just finished.
How to choose colors in digital drawing apps: Interface displaying the Color wheel selection tab from the toolbar, with a sample sketch on my body model croquis using Adobe Fresco.
Use the color selection tool to pick the color for your dress, then start coloring it in.
Sometimes it's okay to color outside the lines! This screen shows the rough coloring of the body and clothing sketches, with a sample sketch on my body model croquis using Adobe Fresco. (I'll clean it up later!)
Remember in elementary school when they told you to color inside of the lines?  It’s time to totally ignore that advice – we will fix that in the next step.  Right now just make sure all of the garment is covered with the color.  If you want to color in different objects (like the dress and then the hair or skin) make sure to use different layers for each – it will help with cleanup in the next step.

Step 8: Clean it up

Because the watercolor tool is a bit runny (like real watercolors!) it tends to spread a bit without control.  This is ok though because now we are going to use one of the best tools of the digitial artist – the erase tool.  In real life we think of using erasers with pencils… and not much else.  Digitally though, we can use it on everything.  This will help us get really sharp outlines on our watercolor paints.

How to use the eraser tool in digital sketching: Interface displaying the selection of the eraser tool with 100% hardness, , with a sample sketch on my body model croquis using Adobe Fresco.
Choose the eraser tool, making sure you are in the layer you want to erase.  Use the brush settings to set the size.  Make sure the hardness is 100% – this will erase everything the brush touches.
How to clean up your sketch using the eraser tool: This screen shows how I am erasing color outside of the lines, with a sample sketch on my body model croquis using Adobe Fresco.
Use the eraser tool to remove unwanted brush strokes from your image.  Use the eraser size for even more control or to get rid of a lot of color in one motion.
Using the eraser tool, before and after comparison with a sample dress sketch on my body model croquis using Adobe Fresco. On the left is the cleaned up version. The sketch on the rights still needs to be cleaned up with the eraser tool.
Look at the difference Before (back) and After (front) using the eraser tool.  It can give some serious polish to your image and make it look like you have the control that you’d get with a real paintbrush.  
How to repeat the erasing step for each layer, with a sample sketch on my body model croquis using Adobe Fresco.
Make sure to do this for every layer of color. If you are trying to erase something and nothing seems to be happening, make sure you are in the layer you want to adjust. 
How to re-order layers! Interface on the right hand side of the screen, with a sample sketch on my body model croquis using Adobe Fresco.
You can drag and drop to reorder your layers.  For this project, it makes sense to have the skin layer under the dress layer, even though I colored in the dress layer first.  By reordering, it looks like the dress is on top of the skin, but under the hair and shoes. 

Step 9: Final outlines

During this step we are going to finalize the way our image looks.  I want my drawing to look like I’ve gone over it in an ink pen, so I’m going to try the Vector Brushes for this step.

How to select the Vector Brush, a matching color from Color tab, and a new layer, with a sample sketch on my body model croquis using Adobe Fresco as a fashion design app.
Make sure you’ve started a new layer and choose the Vector Brush tool. Pick a pen type, then use the color wheel to pick a color.  Using the “Recents” color options at the bottom will allow you to perfectly match your earlier colors.  By playing with the opacity slider, you can make a softer line that will better blend into your image.
This screen shows how I draw new lines to be permanent and define the fashion design, with a sample Burda dress sketch on my body model croquis using Adobe Fresco.
Draw over the lines you want to emphasize on your image.  For this step I’m going to focus more on the garment to make it pop, and place more subtle details on the rest of the figure.
This screen shows how to use the ruler tool to create straight lines, with a sample sketch on my body model croquis using Adobe Fresco.
Since this will be the final part of my image, I want some of the seamlines to be perfectly straight.  I’m using the ruler tool from the lower right corner to make sure my finished drawing is a bit cleaner than my original sketch.  
This screen shows the undo and redo buttons that are important to remember when making edits in fashion design apps, with a sample sketch on my body model croquis, using Adobe Fresco.
Don’t forget that you have undo and redo buttons at the top of the page!  While I don’t worry as much about making mistakes in the earlier steps, I do tend to want the final “ink” layer to have a bit more precision. 

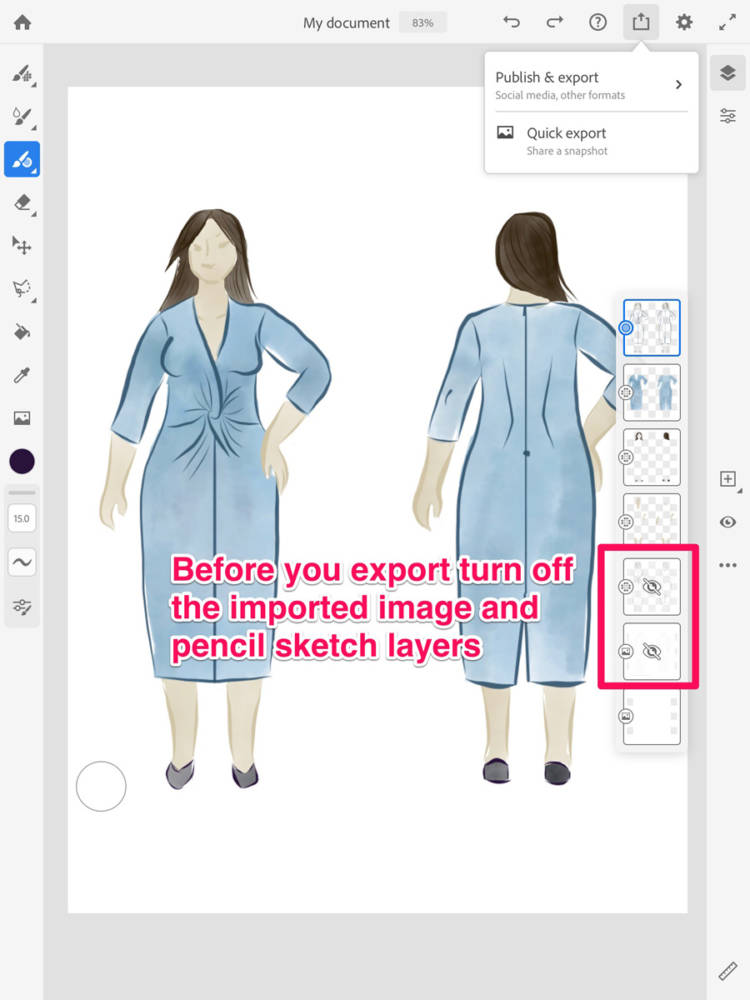
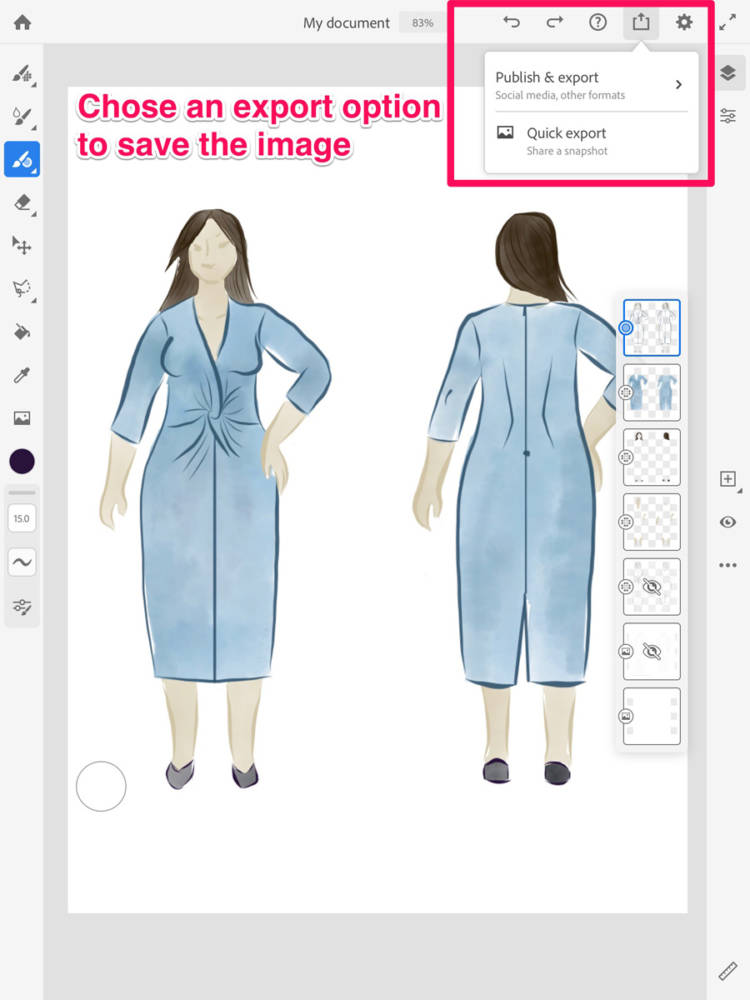
Step 10: Export your image

Once you are done, it’s time to share!  This is the last step to save your image so that you can use it for social media, print it for your sewing journal, or import it into a digital planner.

This shows the screen displaying location to turn off the imported image and sketch layers before exporting an image in fashion design apps, with a sample sketch on my body model croquis, using Adobe Fresco.
Once you are done making your image, be sure to turn off any layers you don’t want to be in your final drawing.  I’ve turned off my pencil sketch and the My Body Model original image.  If you decide you like the look of the pencil sketch under the watercolor, you might want to turn off the ink and the My Body Model image.  This is a time to play and see what you want in your final picture.
This shows my screen display of buttons for exporting and saving a finished image, with a sample sketch on my body model croquis, part of a step by step tutorial of using fashion design apps like Adobe Fresco.
Choose how you want to export your image.  Quick export will give you the normal options to save or share an image to your other apps or as an email or text message.  Publish and export gives you more options such as file type and even a timelapse export, which is really cool for sharing in Instagram stories or other social media outlets.
Final outfit drawing on my body model fashion croquis as examples of results from this step by step tutorial of fashion design apps like Adobe Fresco
And that’s it – marvel at your hard work and enjoy your final image!

And that’s it!

Jumping in with digital art can seem a bit daunting, but the best thing to do is explore and play around. 

You’ll find tools and techniques you really enjoy, and some you don’t, but it’s all part of the learning process. 

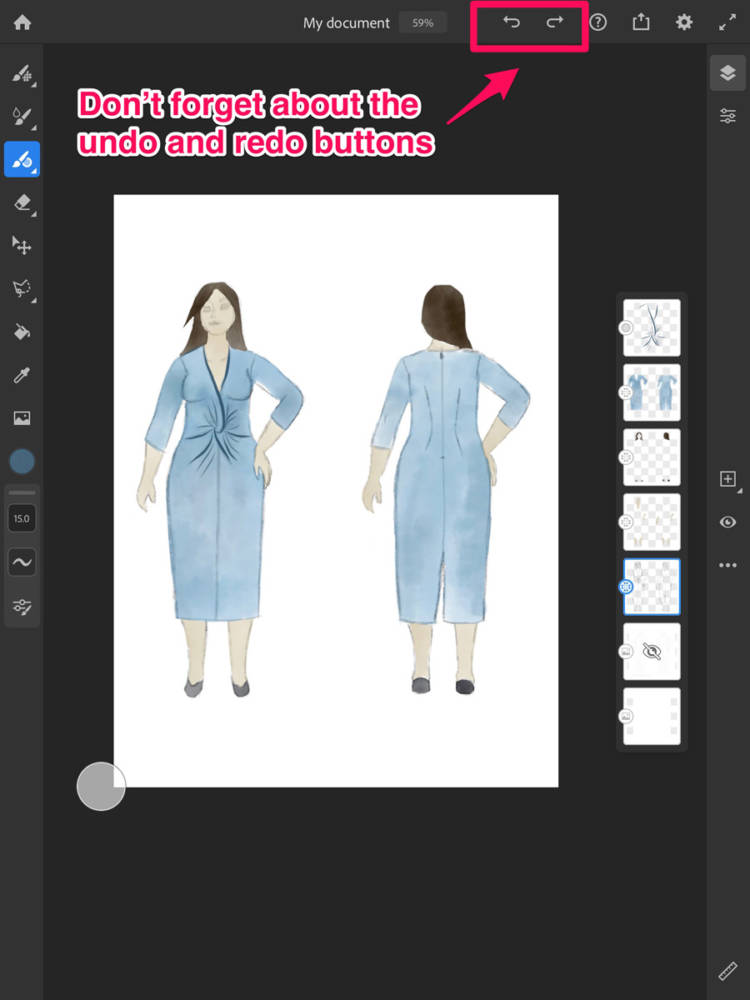
The great thing about digital art is that it is so easy to undo or erase anything you don’t like, and to use layers to make a bunch of different versions of things without having to start over from scratch.  Plus, using these apps is like having infinite paper and a lot of artistic resources (like paint and pens) in all the colors of the rainbow to really let your ideas shine and not be hindered by the state of your toolbox. 

Hopefully this tutorial was helpful and you can now go forth and create lots of fun digital designs!


Are you ready to give digital fashion drawing a try, but want to start with a free app? Check out MyBodyModel’s step-by-step video course for beginners, “Digital Paper Dolls” at Illustrated Style School and learn to draw digitally on your tablet using the free app, Autodesk Sketchbook for iOS (Apple) or Android.


Here is a timelapse of the image creation process – enjoy!
In Fashion Design Apps for Beginners Part 1, Doctor T shares a step by step tutorial with the basics of sketching clothing designs on her custom MyBodyModel fashion croquis with Adobe Fresco.
Did you enjoy this tutorial? Please pin and share!

10 thoughts on “Fashion Design Apps for Beginners 1: Adobe Fresco”

  1. This is awesome! I am just starting to plan a travel capsule. I already have my own body model. I am excited to try this. I don’t have an iPad so I have some exploring to do.
    Thank you,
    Sue

  2. Pamela Shadle Flores

    Fantastic! I use digital drawing, but I didn’t know about half of these tips. Thanks for sharing!

  3. This is fantastic – I’ve always been very daunted by digital drawing, but I’ve just installed Fresco and copied your sketch, and it worked! Excited by the opportunities this gives me. Thanks for a great post

Leave a Comment

Your email address will not be published. Required fields are marked *